Gantt
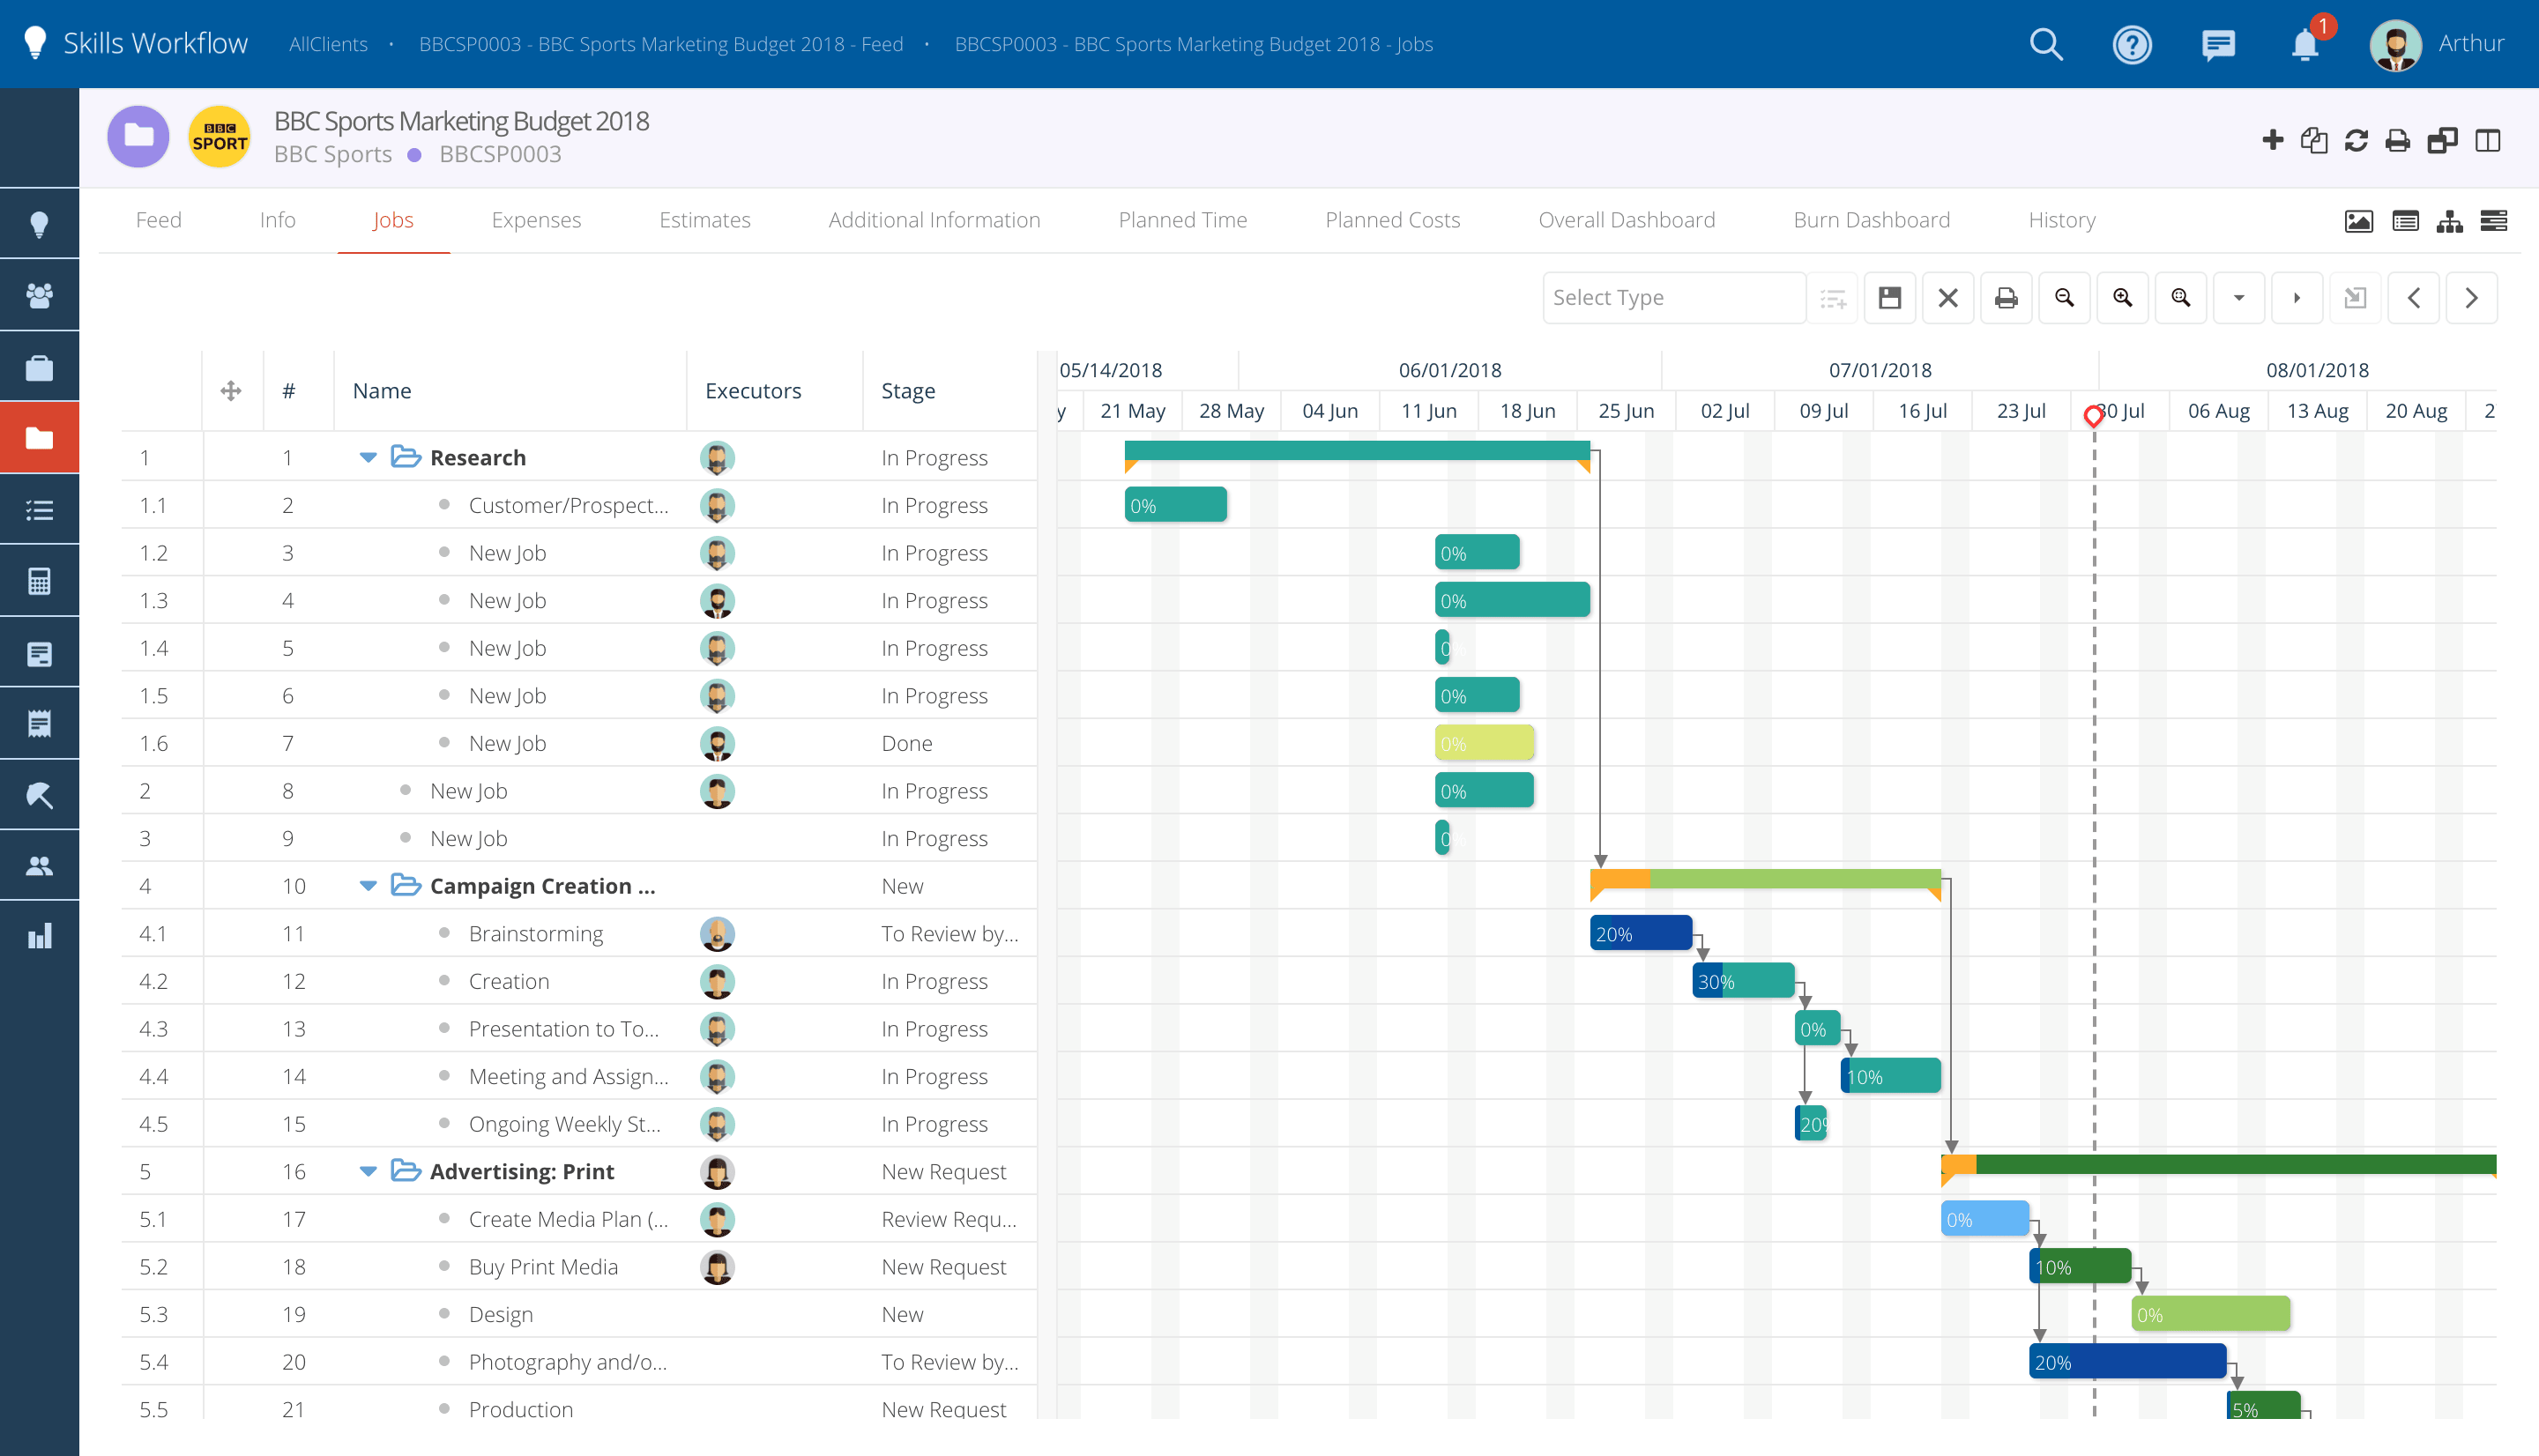
The Gantt shows a project's jobs on a timeline, with the job hierarchy in a grid on the left. Rows in that grid can be selected and acted on as a group: duplicated, or edited together with a bulk action. One of the many ways of visualizing your Projects in Skills Workflow is in a Gantt Chart.
The Gantt view will give a more visual representation of all the jobs of a Project and how they are related to one another through time.
Create your parent and child Jobs
-
Start by creating Jobs inside your Project.
-
Under a parent Job you can also create many child jobs.
Switch to Gantt View.
-
Inside the Project, on the tab "Jobs" click on this symbol.

-
Check your Jobs and their hierarchy on the left.
-
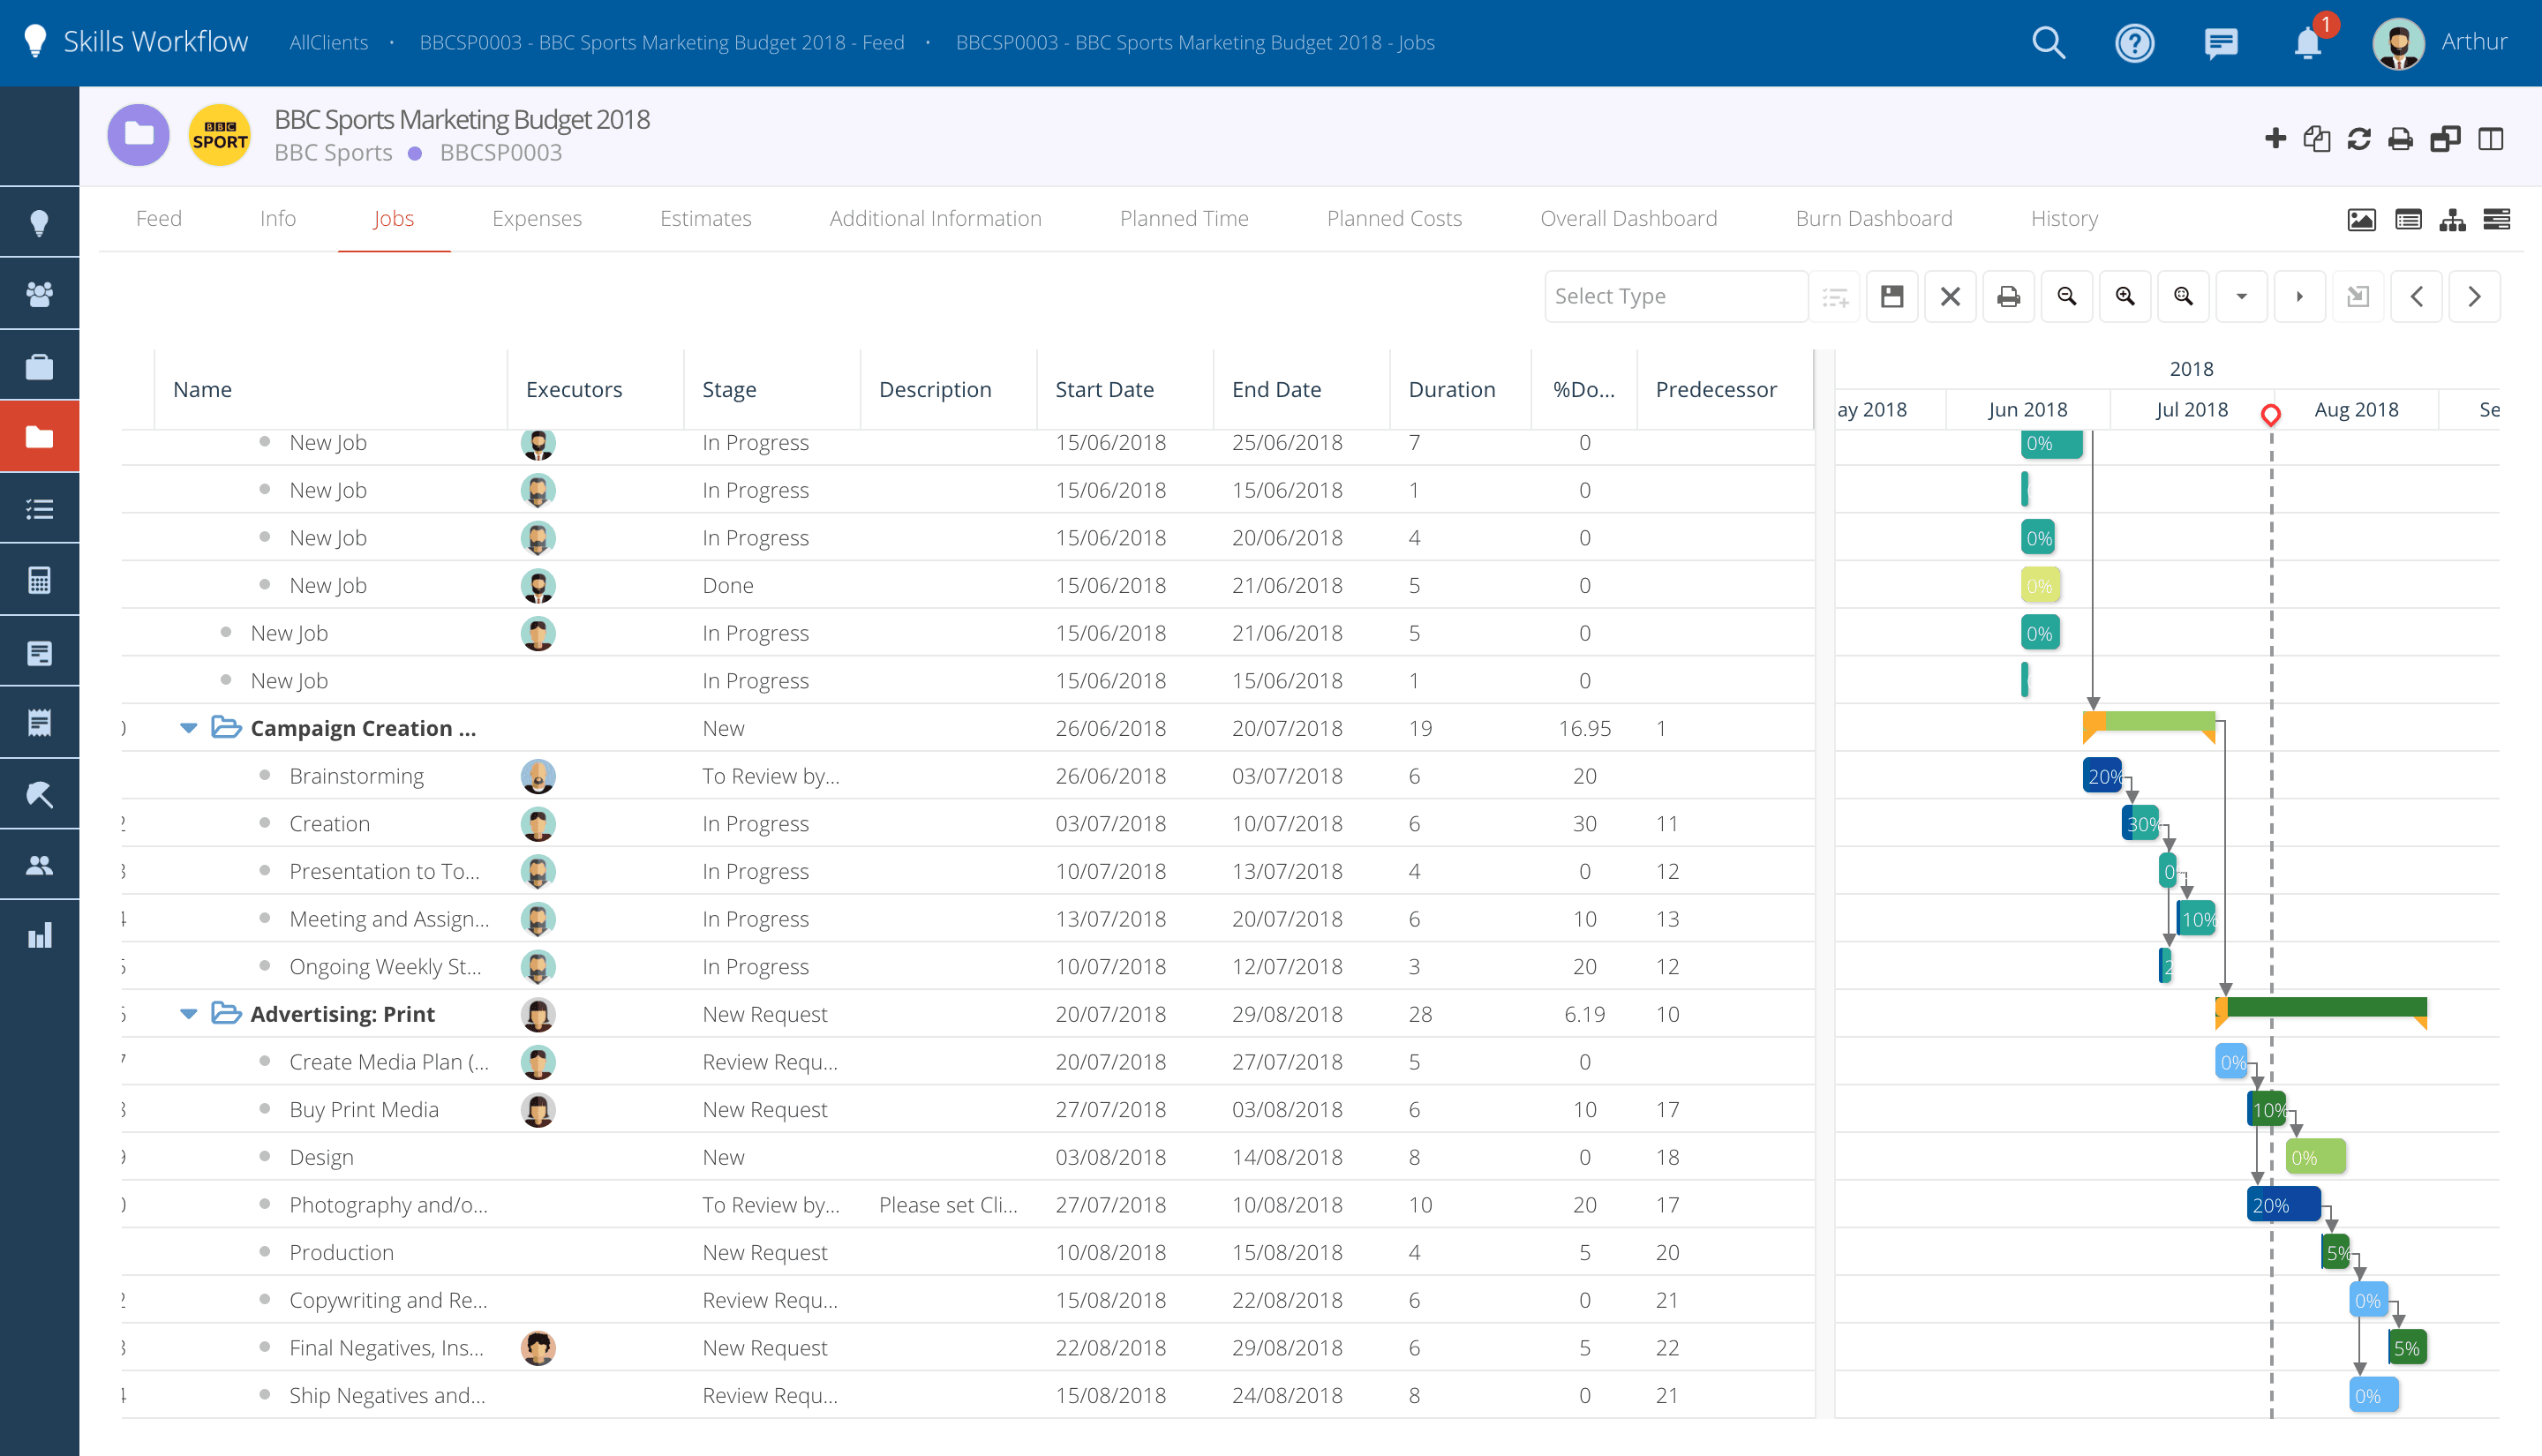
Check start and end date of each Job and adjust if needed.The system calculates duration of each job in days based on the start and end dates defined.
-
You can adjust your jobs by doing changes on the respective columns on the left or by directly moving the horizontal bars.
-
Drag them through the calendar to change the dates or strech/shrink them to lenghten/shorten the duration of the jobs.
-
Configure the dependency between the jobs by filling in the predecessor column.
Check completeness of each job.
-
On the field "% Done" you can check how much has been done on a given job and whether it has already finished (100% done) or is still in progress (<100% done).
-
These percentages are pre-defined based on the Workflow Stage the job is in. E.g. You can define that when a job reaches the stage "Waiting Client Approval " it is 70% complete.
-
As jobs move along the workflow to different stages, these % in the Gantt automatically change, but you can still manually adjust them if needed.
-
The colour of each bar represents the stage that respective job is in.
The Gantt View includes several buttons at the top to help you adjust your chart view:
 - Every time you do a change you'll need to save the changes.
 - Zoom Out
 - Zoom In
 - Zoom to fit all of the information on the screen
 - Expand All to see the details of all Jobs
 - Collapse All to see only the Jobs (parents)
 - Add a new Job
 - Go to the selected Job
JobType Dropdown
-
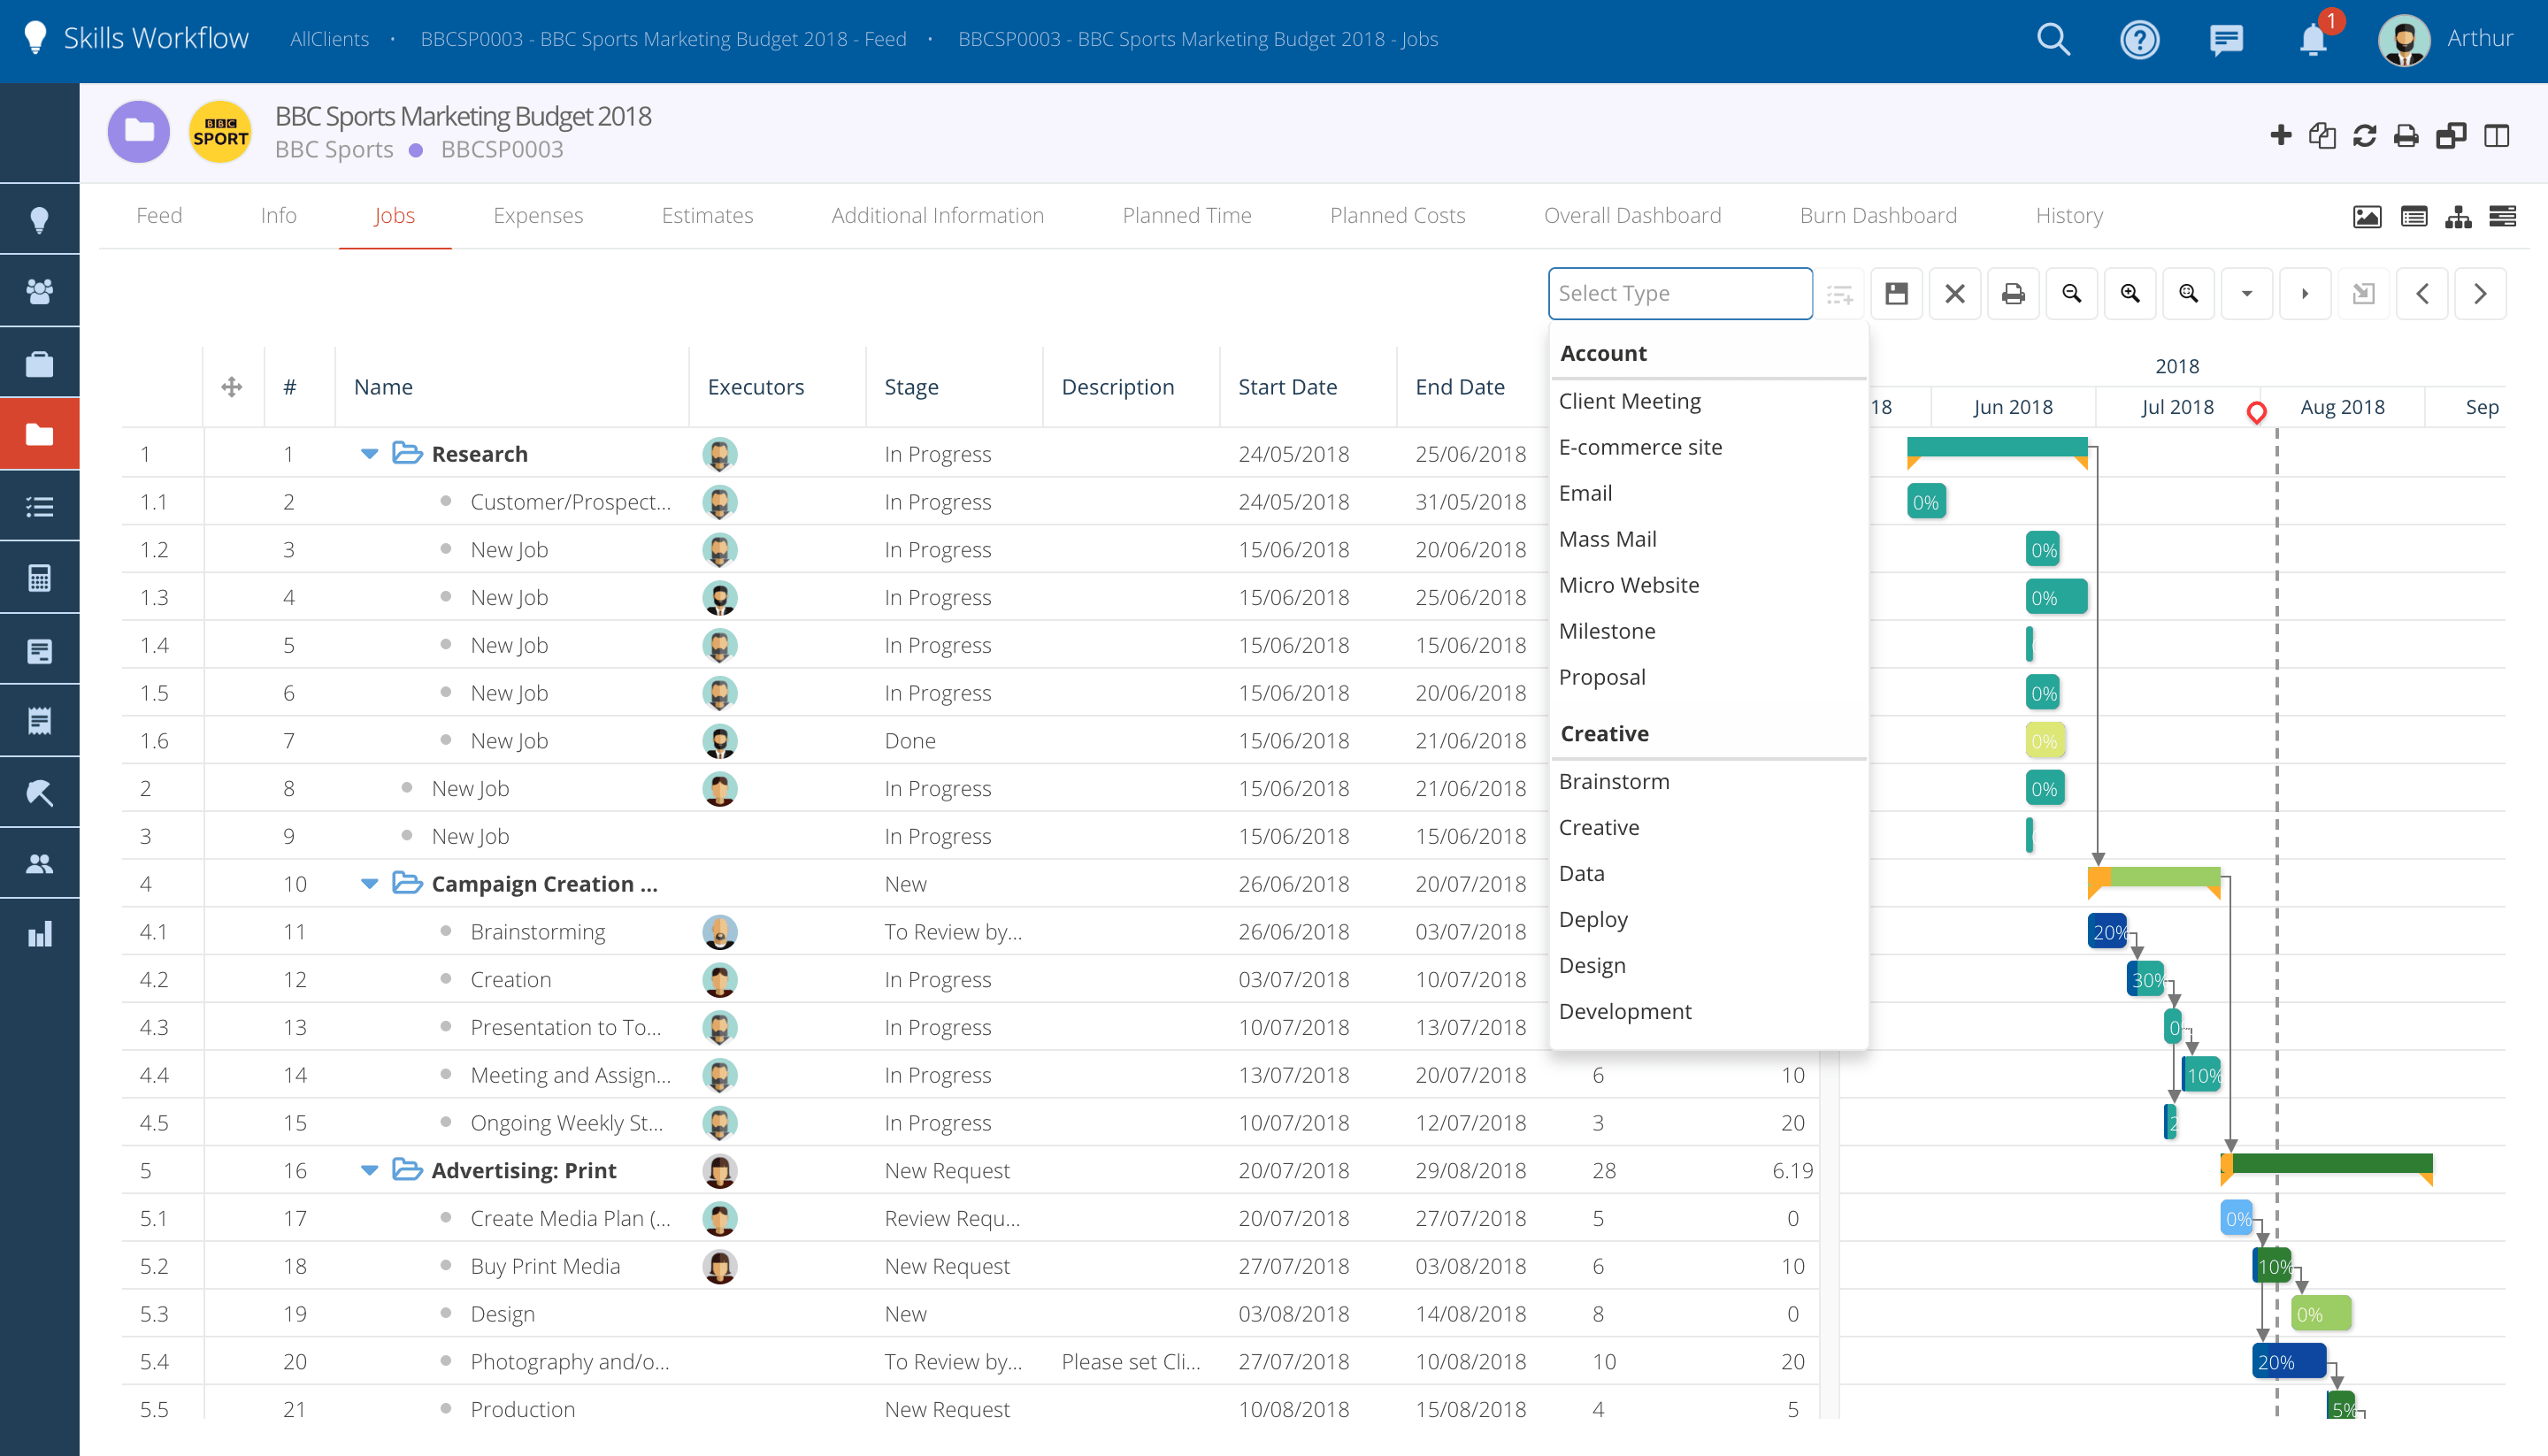
You can easily add Jobs to the Gantt without having to use the regular Job creation pop-up.
-
To add a new Job to the gantt, you'll need to select a Department/Job Type from the dropdown list.
-
When the Job Type is already selected click on the "Add Job" option and the job will be automatically added to the Gantt.
-
The job will only be activated as soon as you click on the "Save" option.
-
It will move to the first stage defined on the Workflow.
Executors Column
-
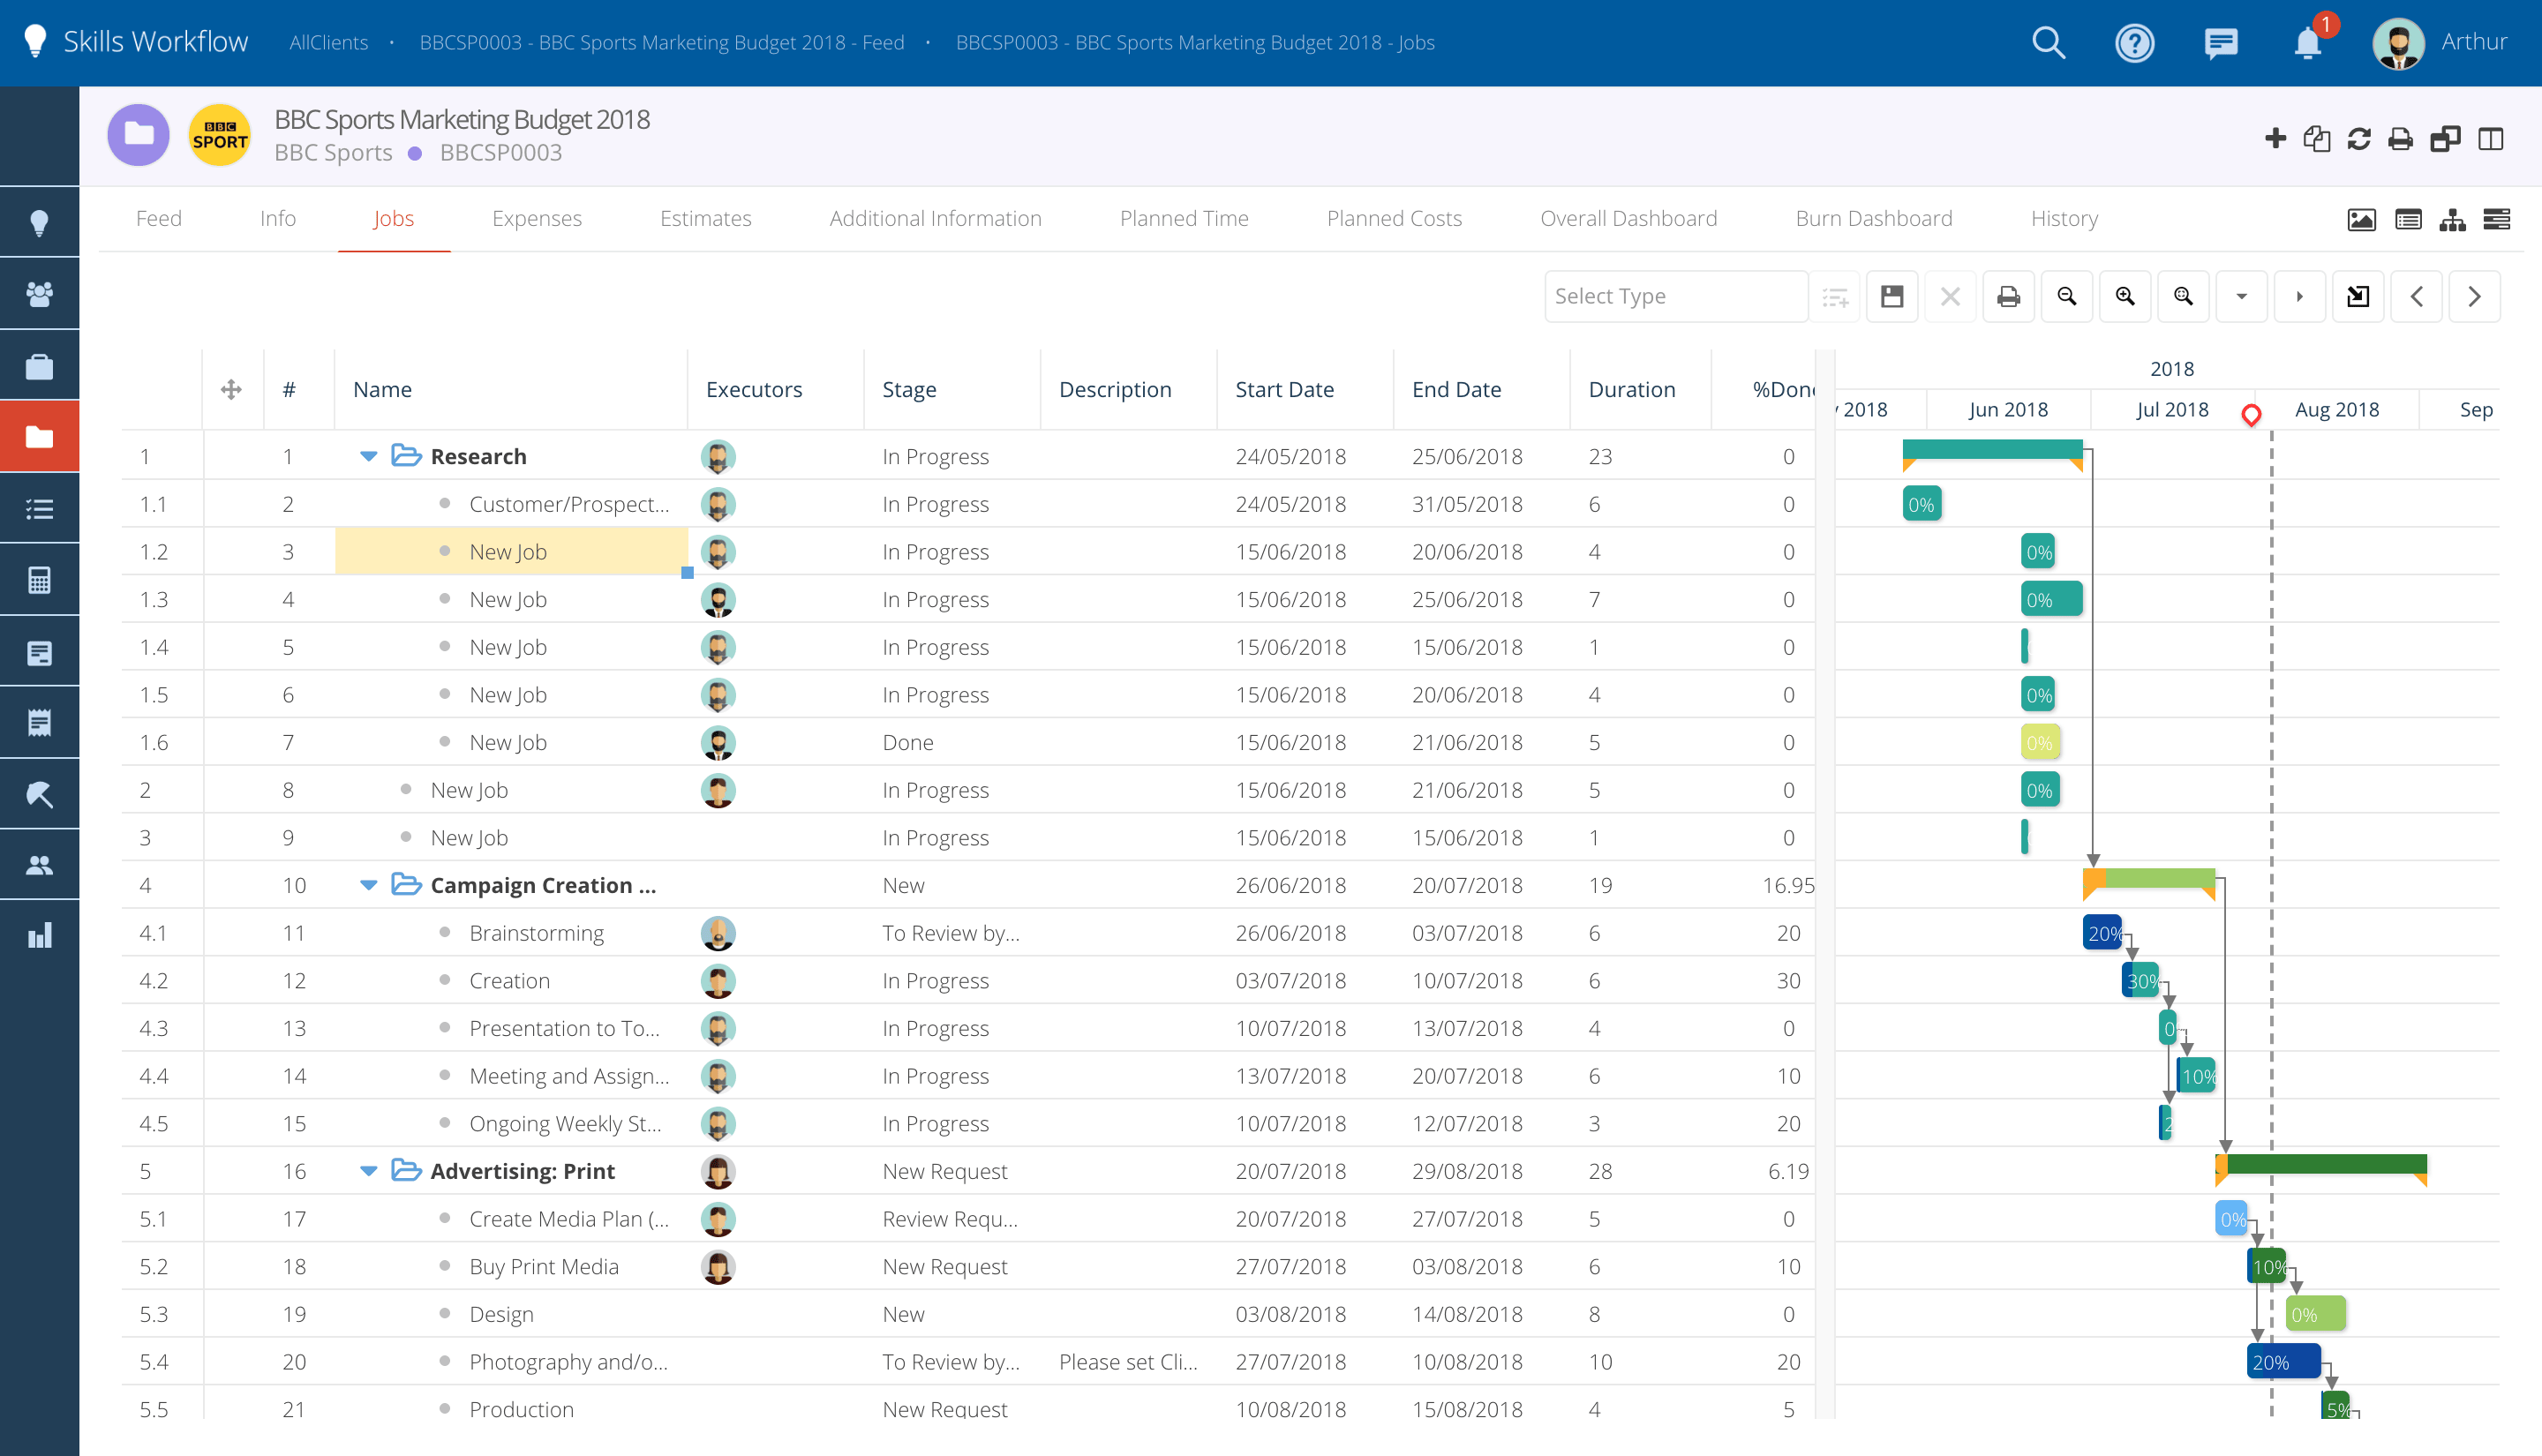
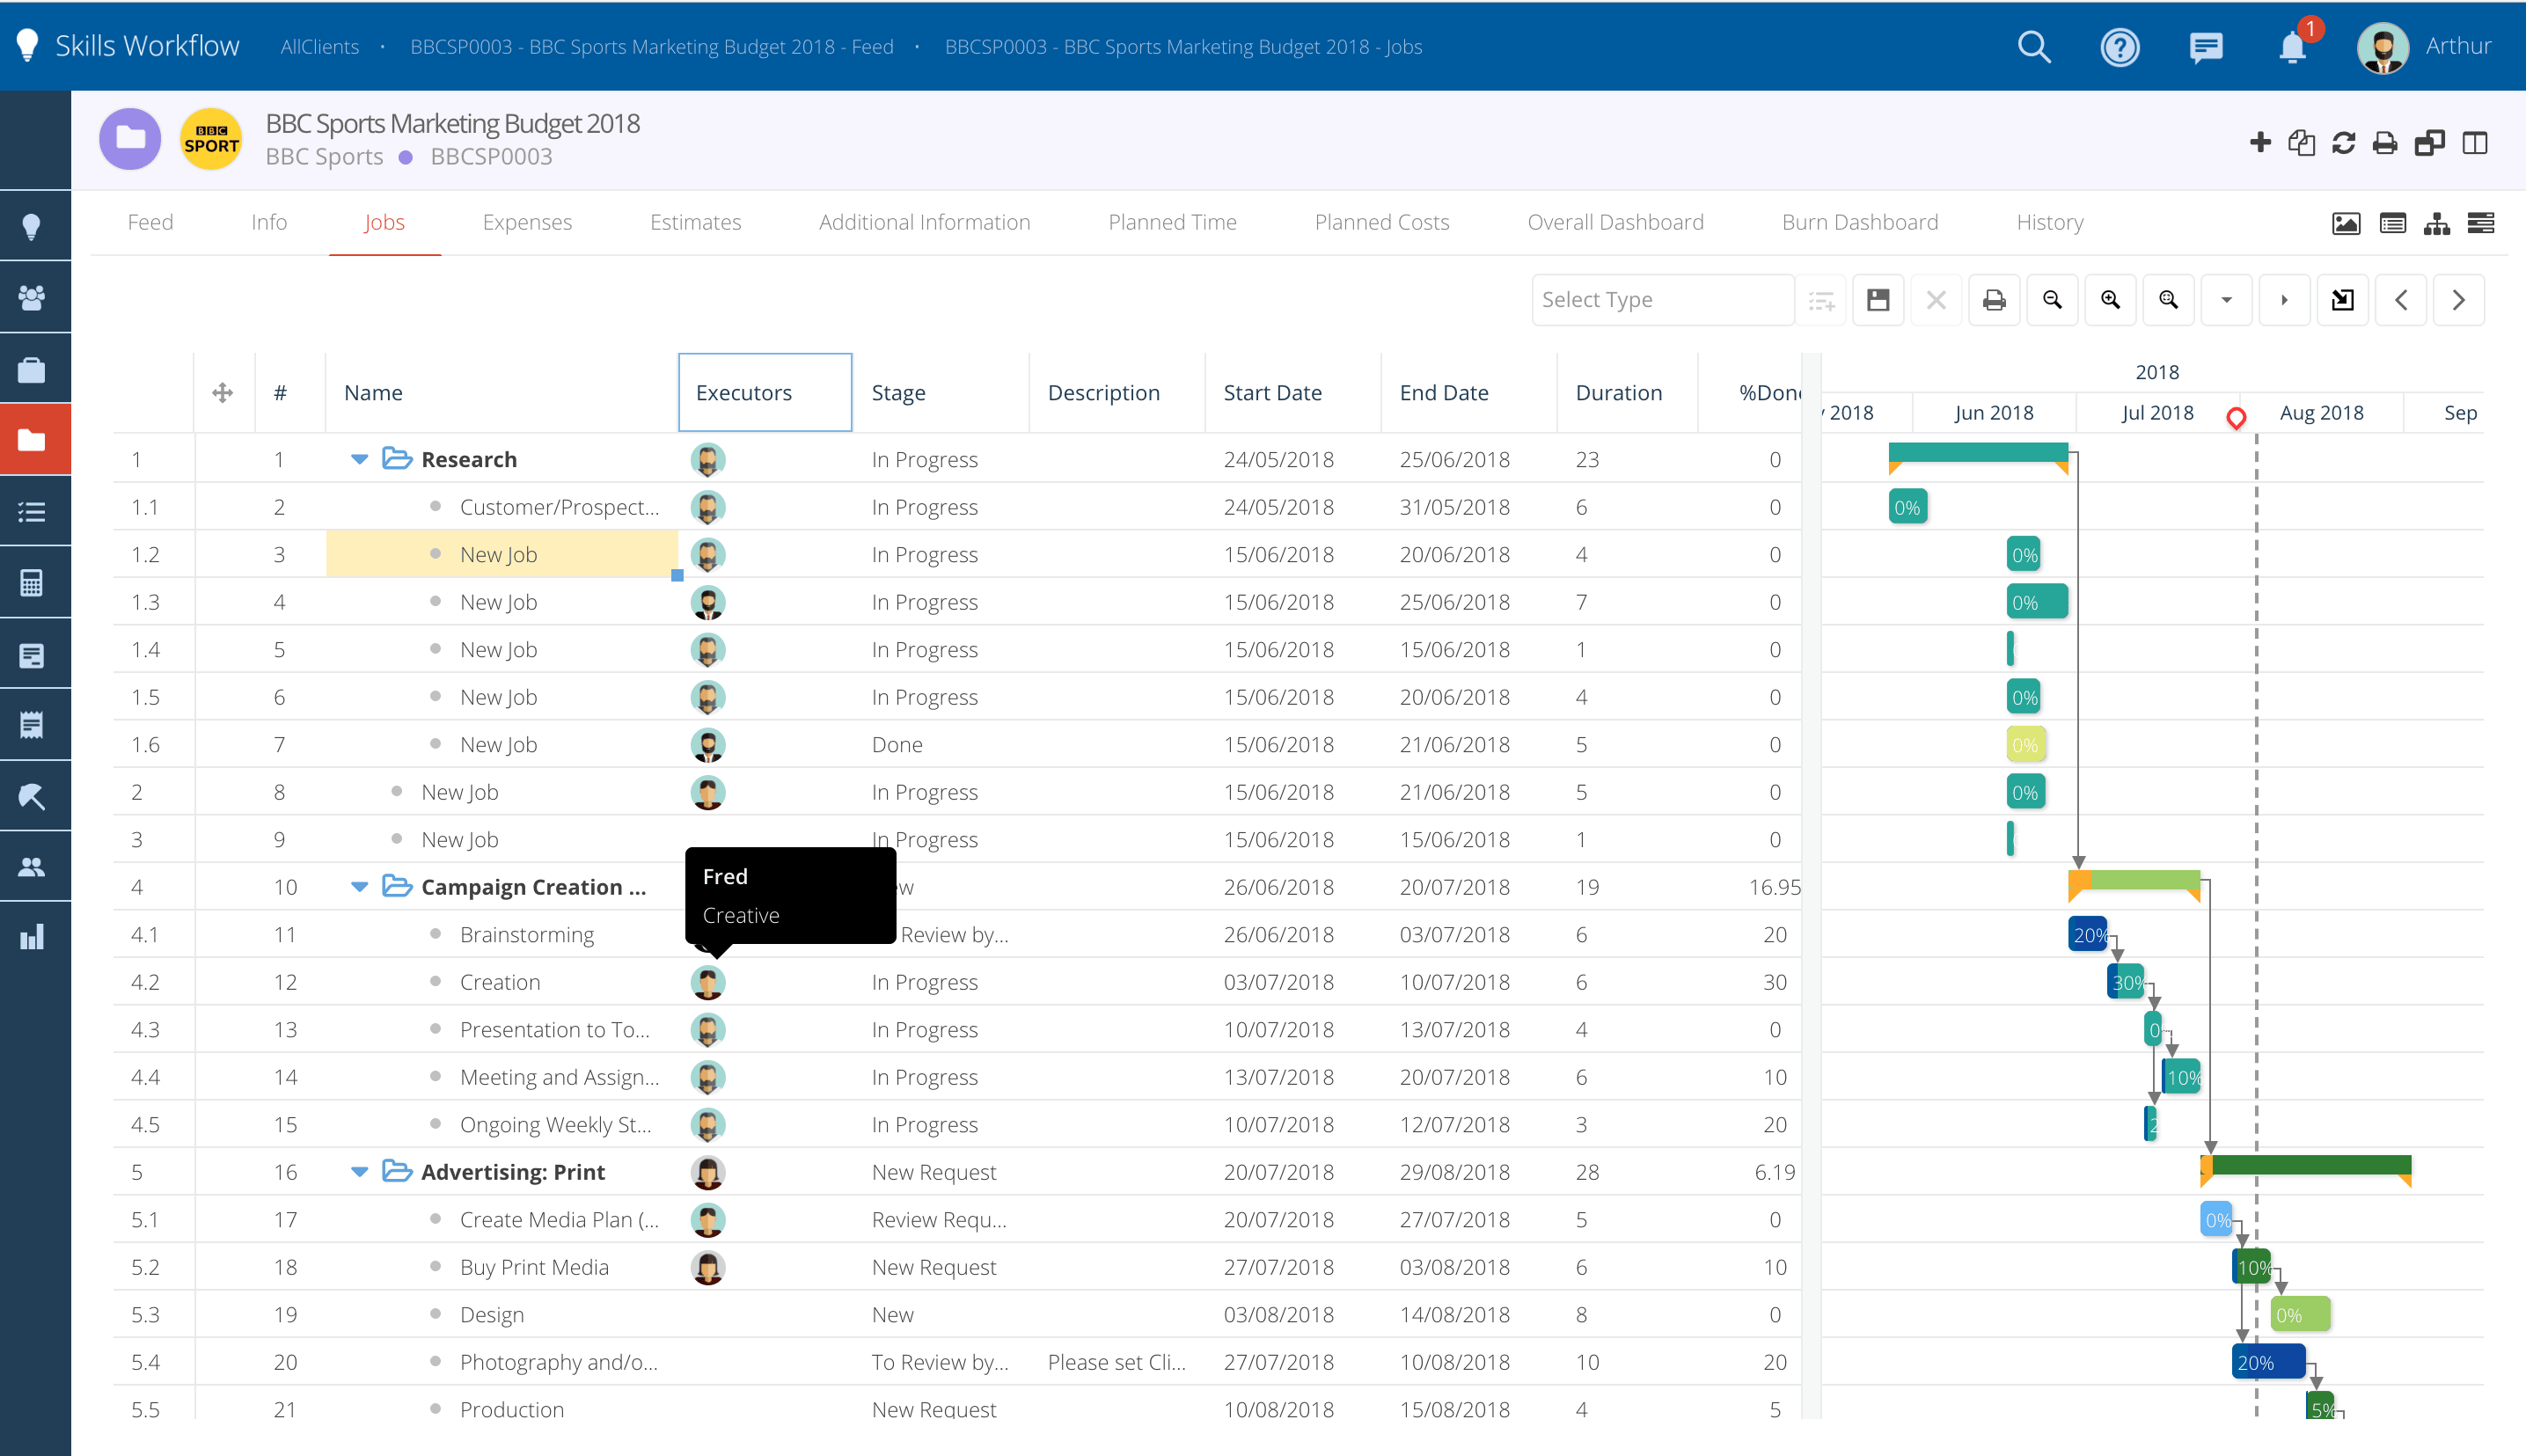
On the Executors Column you can easily check who's been assigned to the jobs by passing your mouse on top of the image.
-
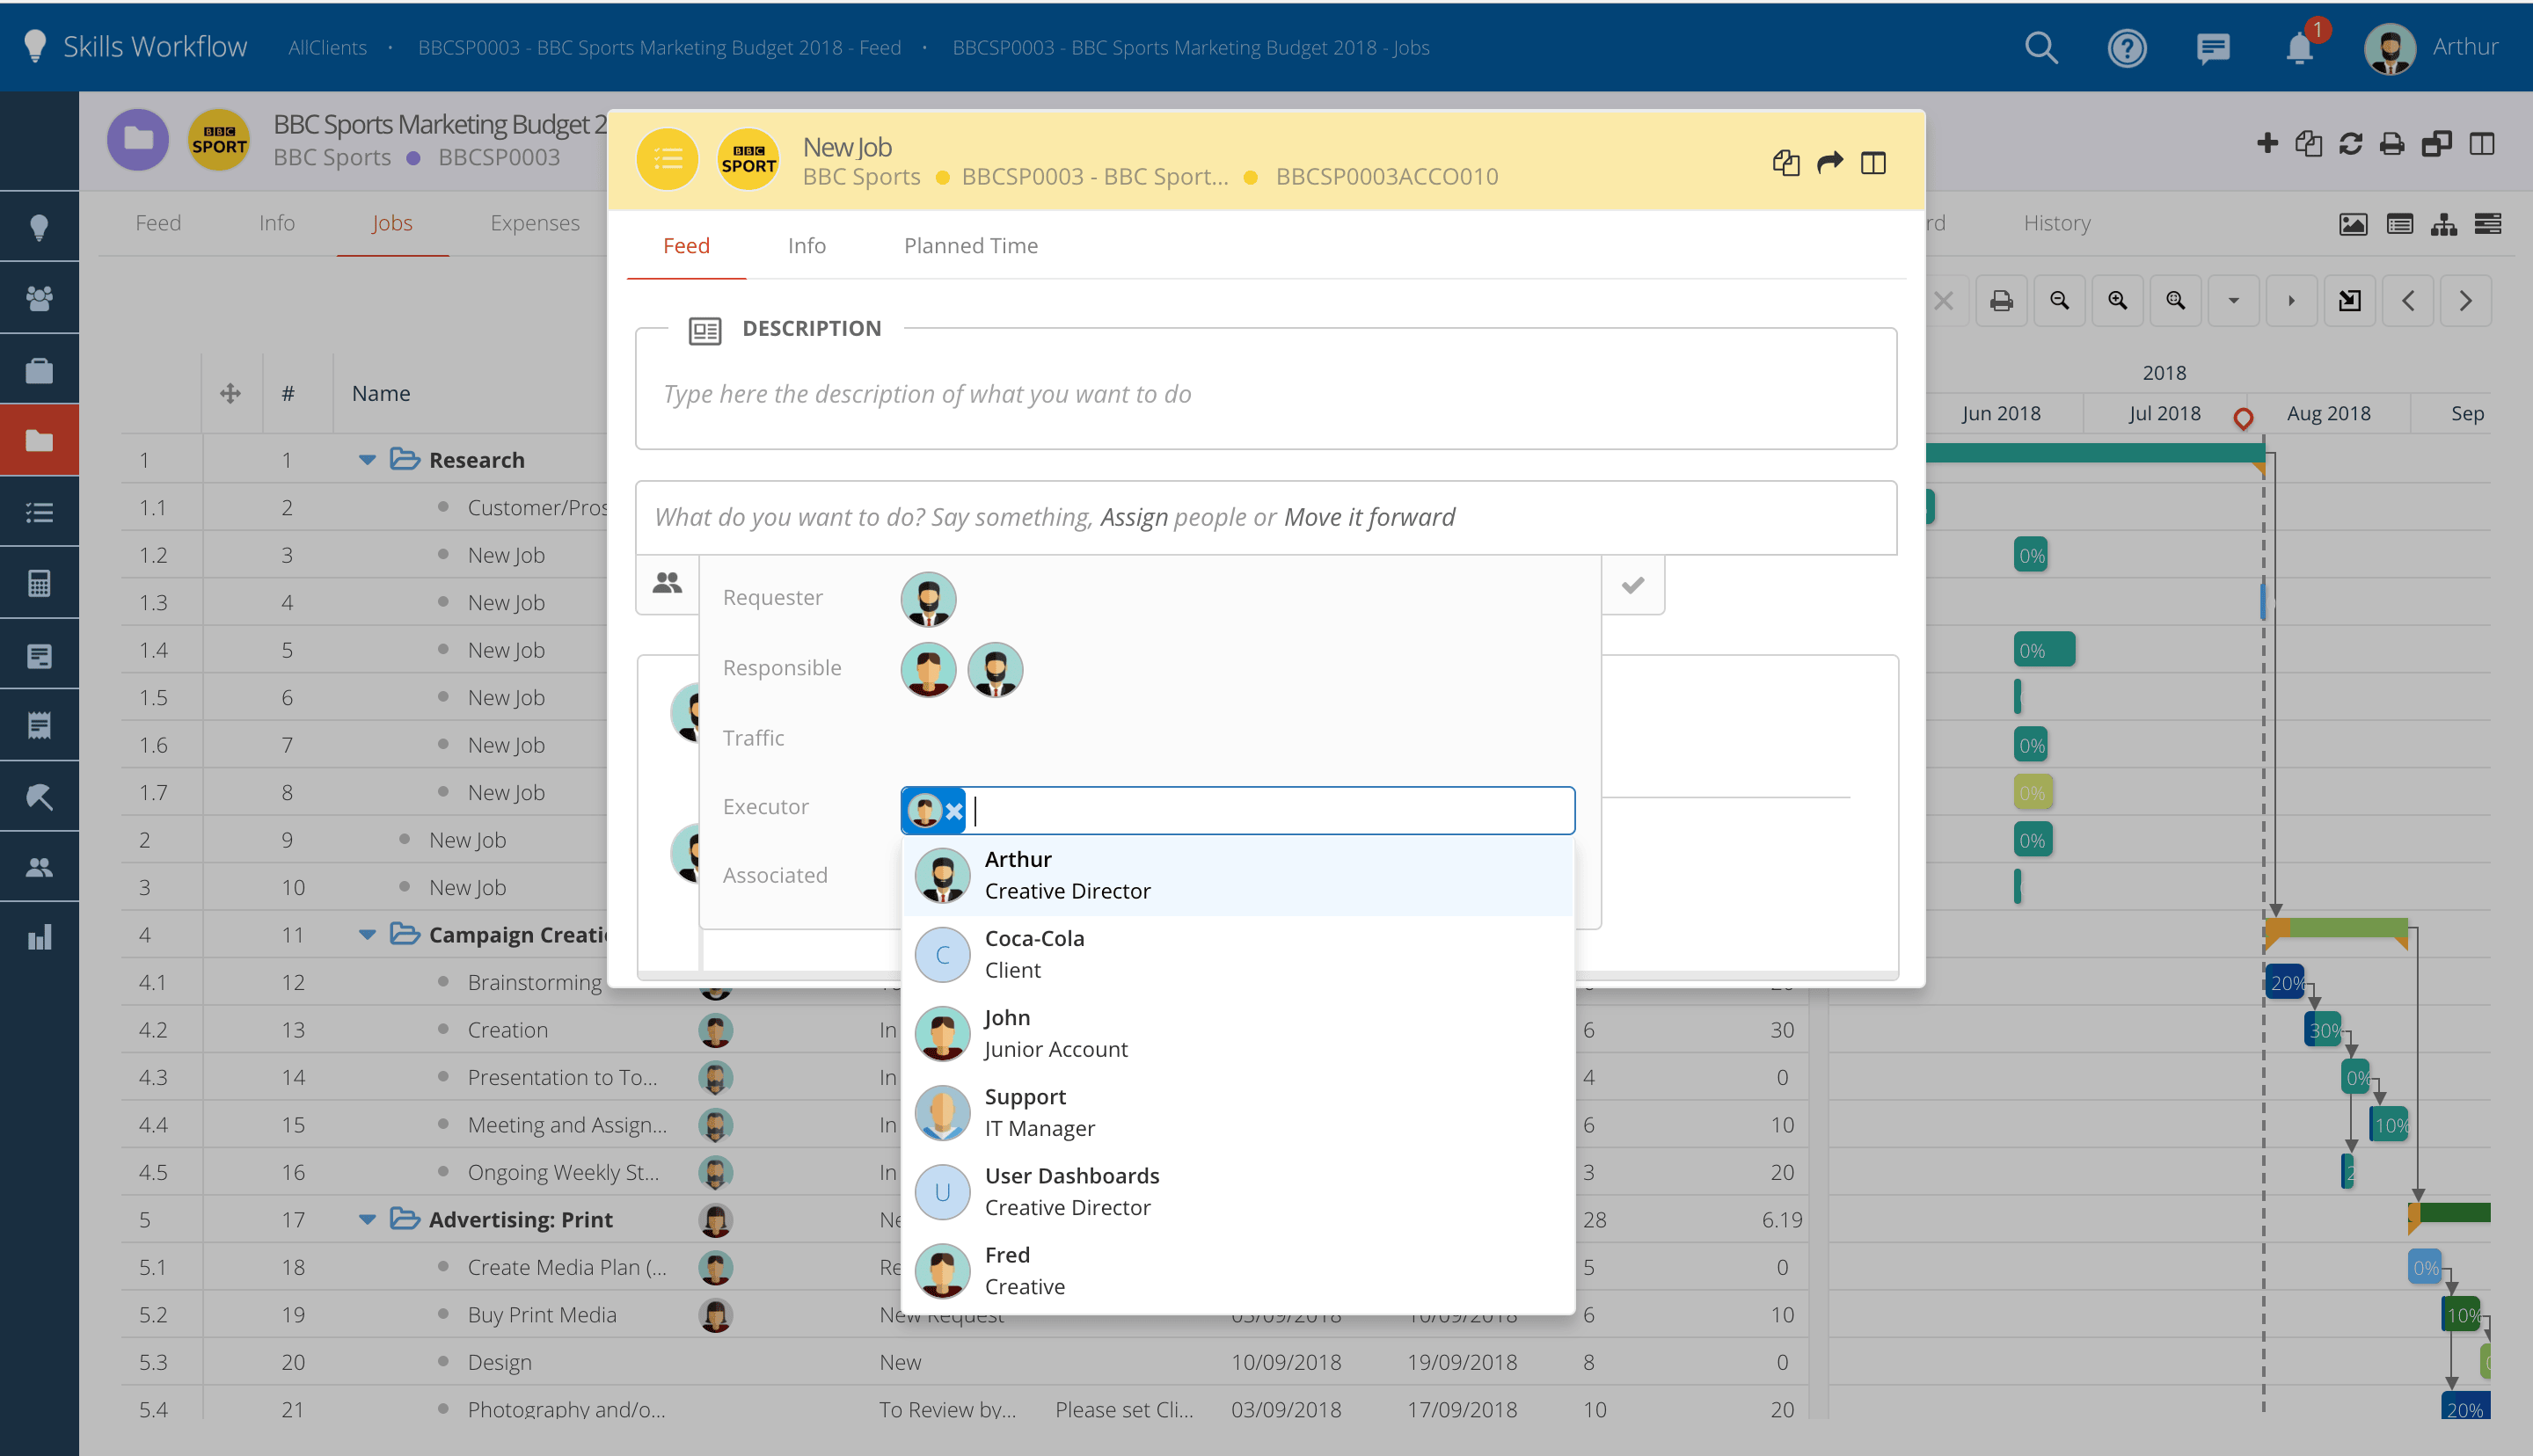
You can also easily assign users by clicking directly on the Executors column. The job will automatically open on the Assignments pop-up.
-
Search for a username or title and click on it to add as an executor. After this you'll need to submit the post.
Copy & Paste the Gantt
-
Jobs can now be easily copied and pasted in order to quickly create Schedules.
-
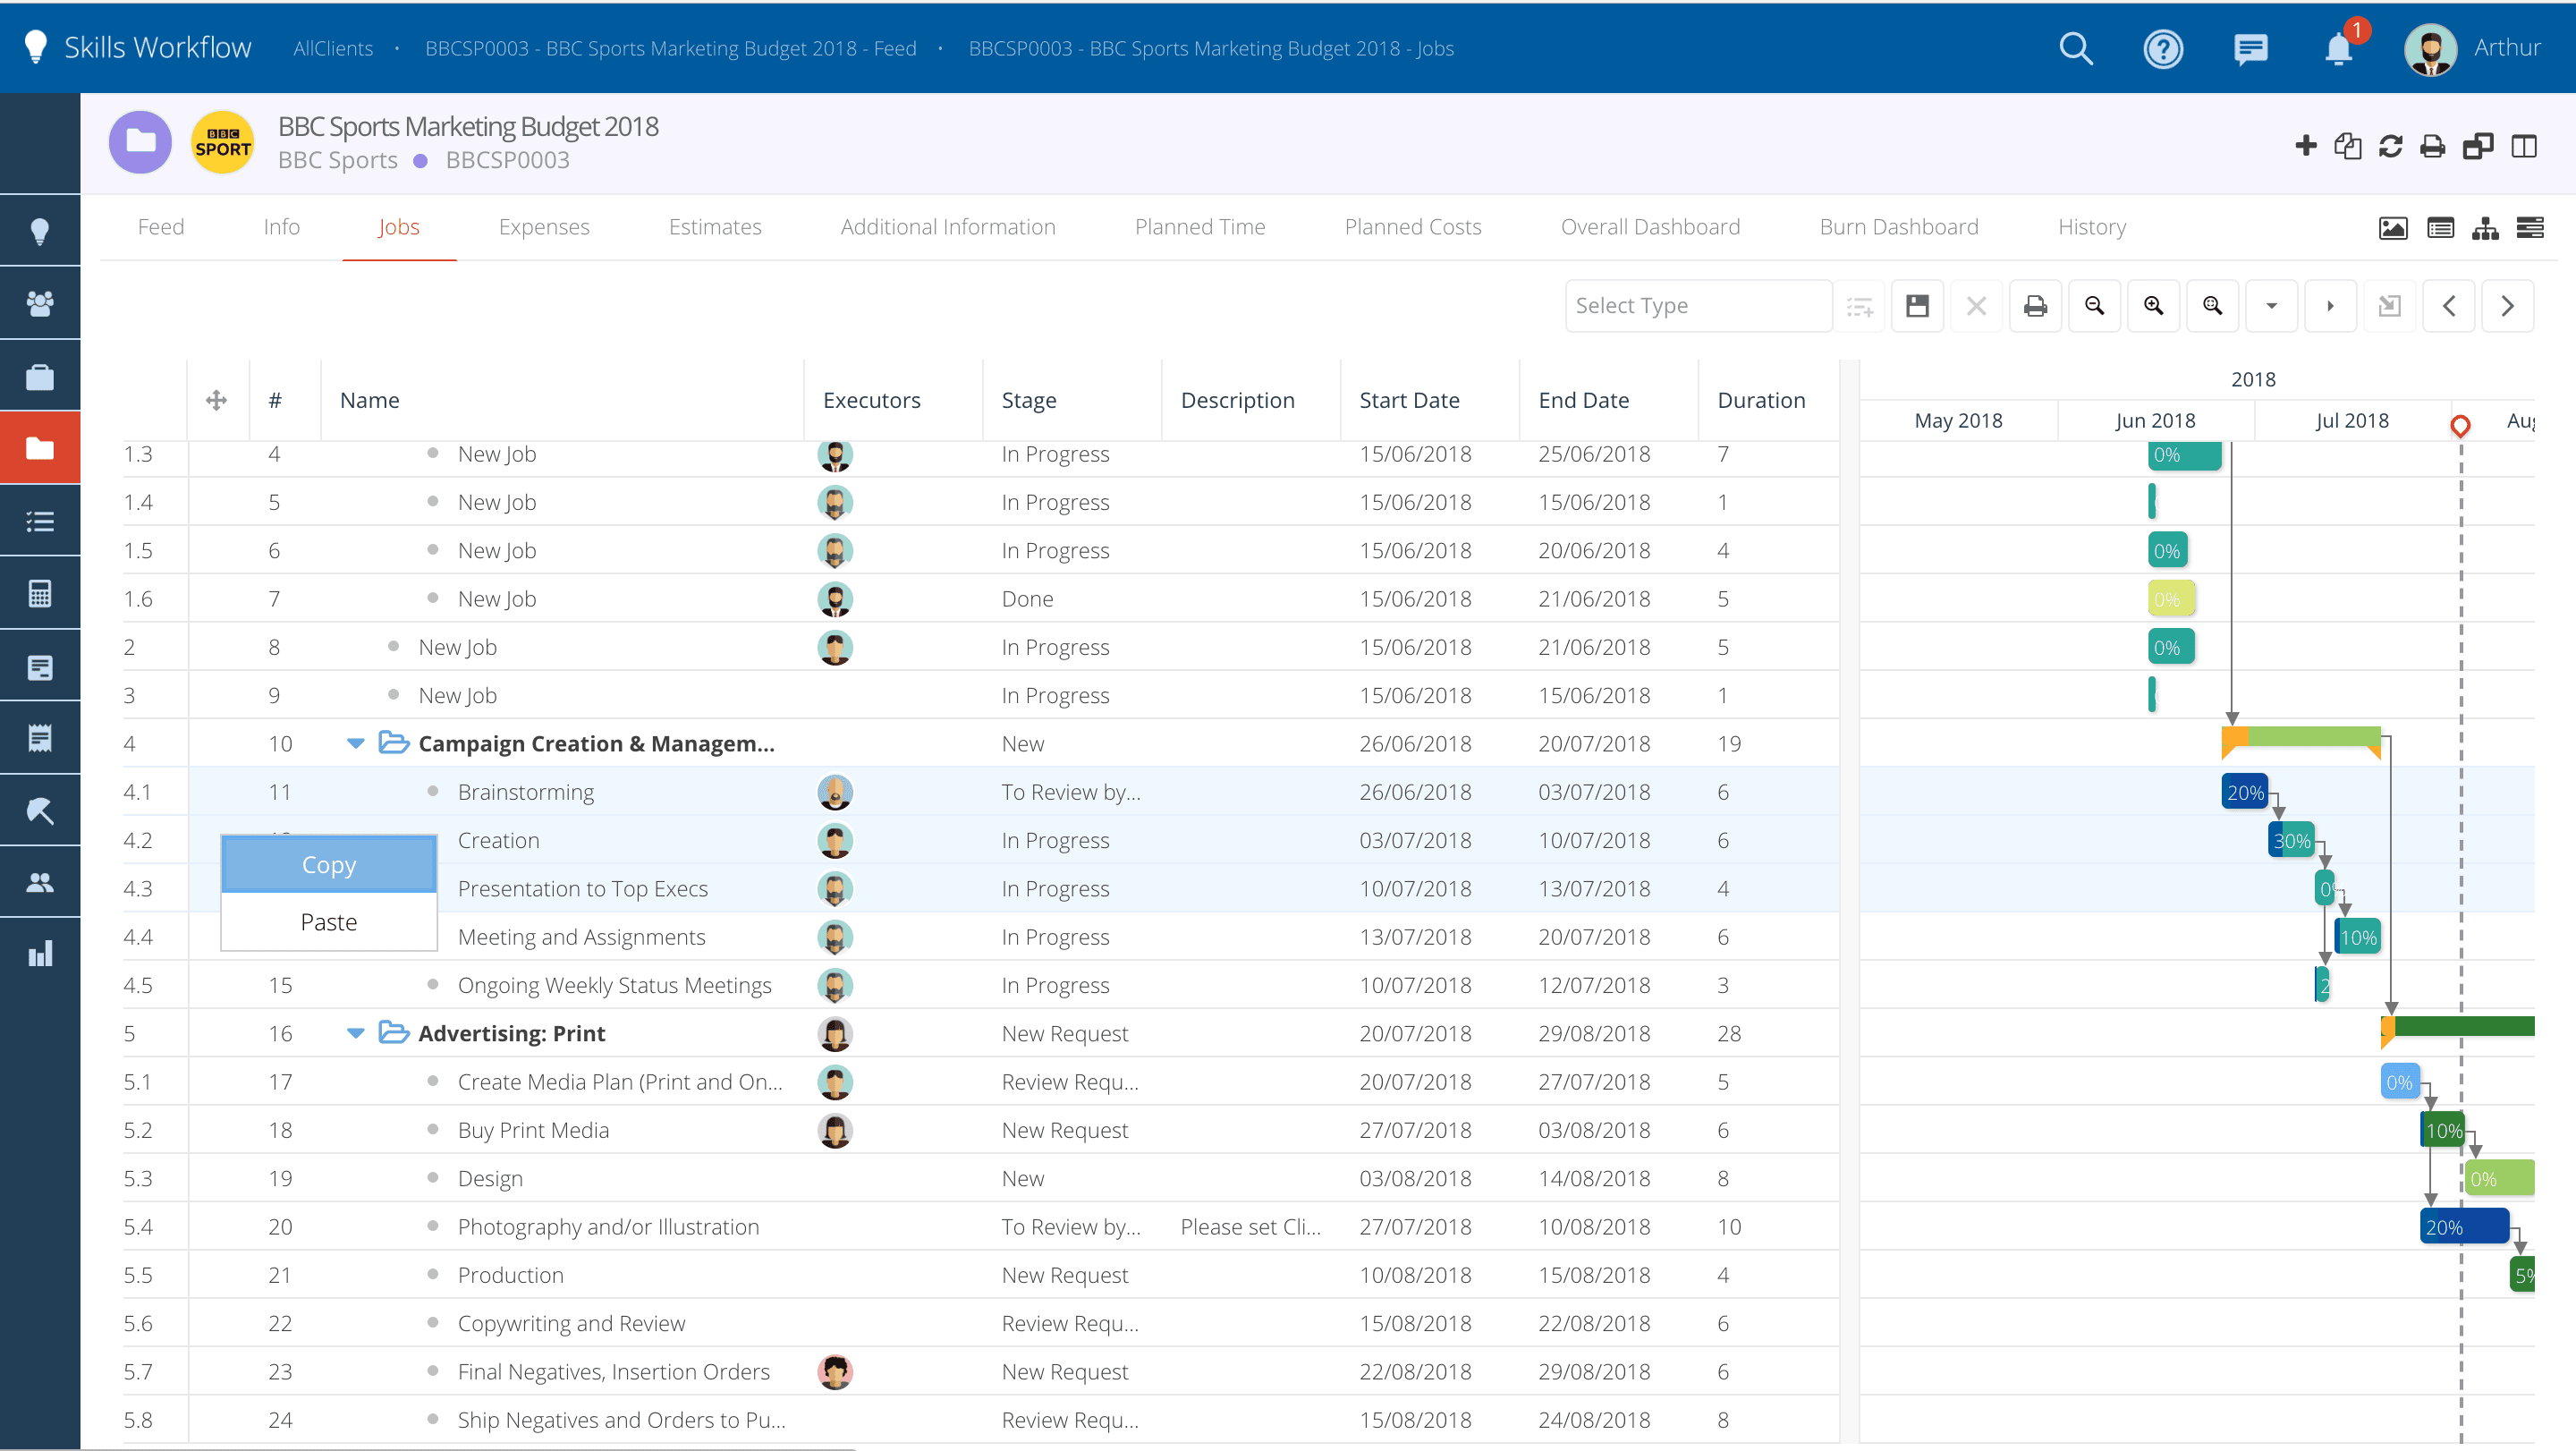
Select the jobs you want to copy, click on the right side of the mouse and select the option Copy.
-
After this, paste the jobs by selecting the option "Paste".
-
You can also copy Jobs and paste them in other Projects.
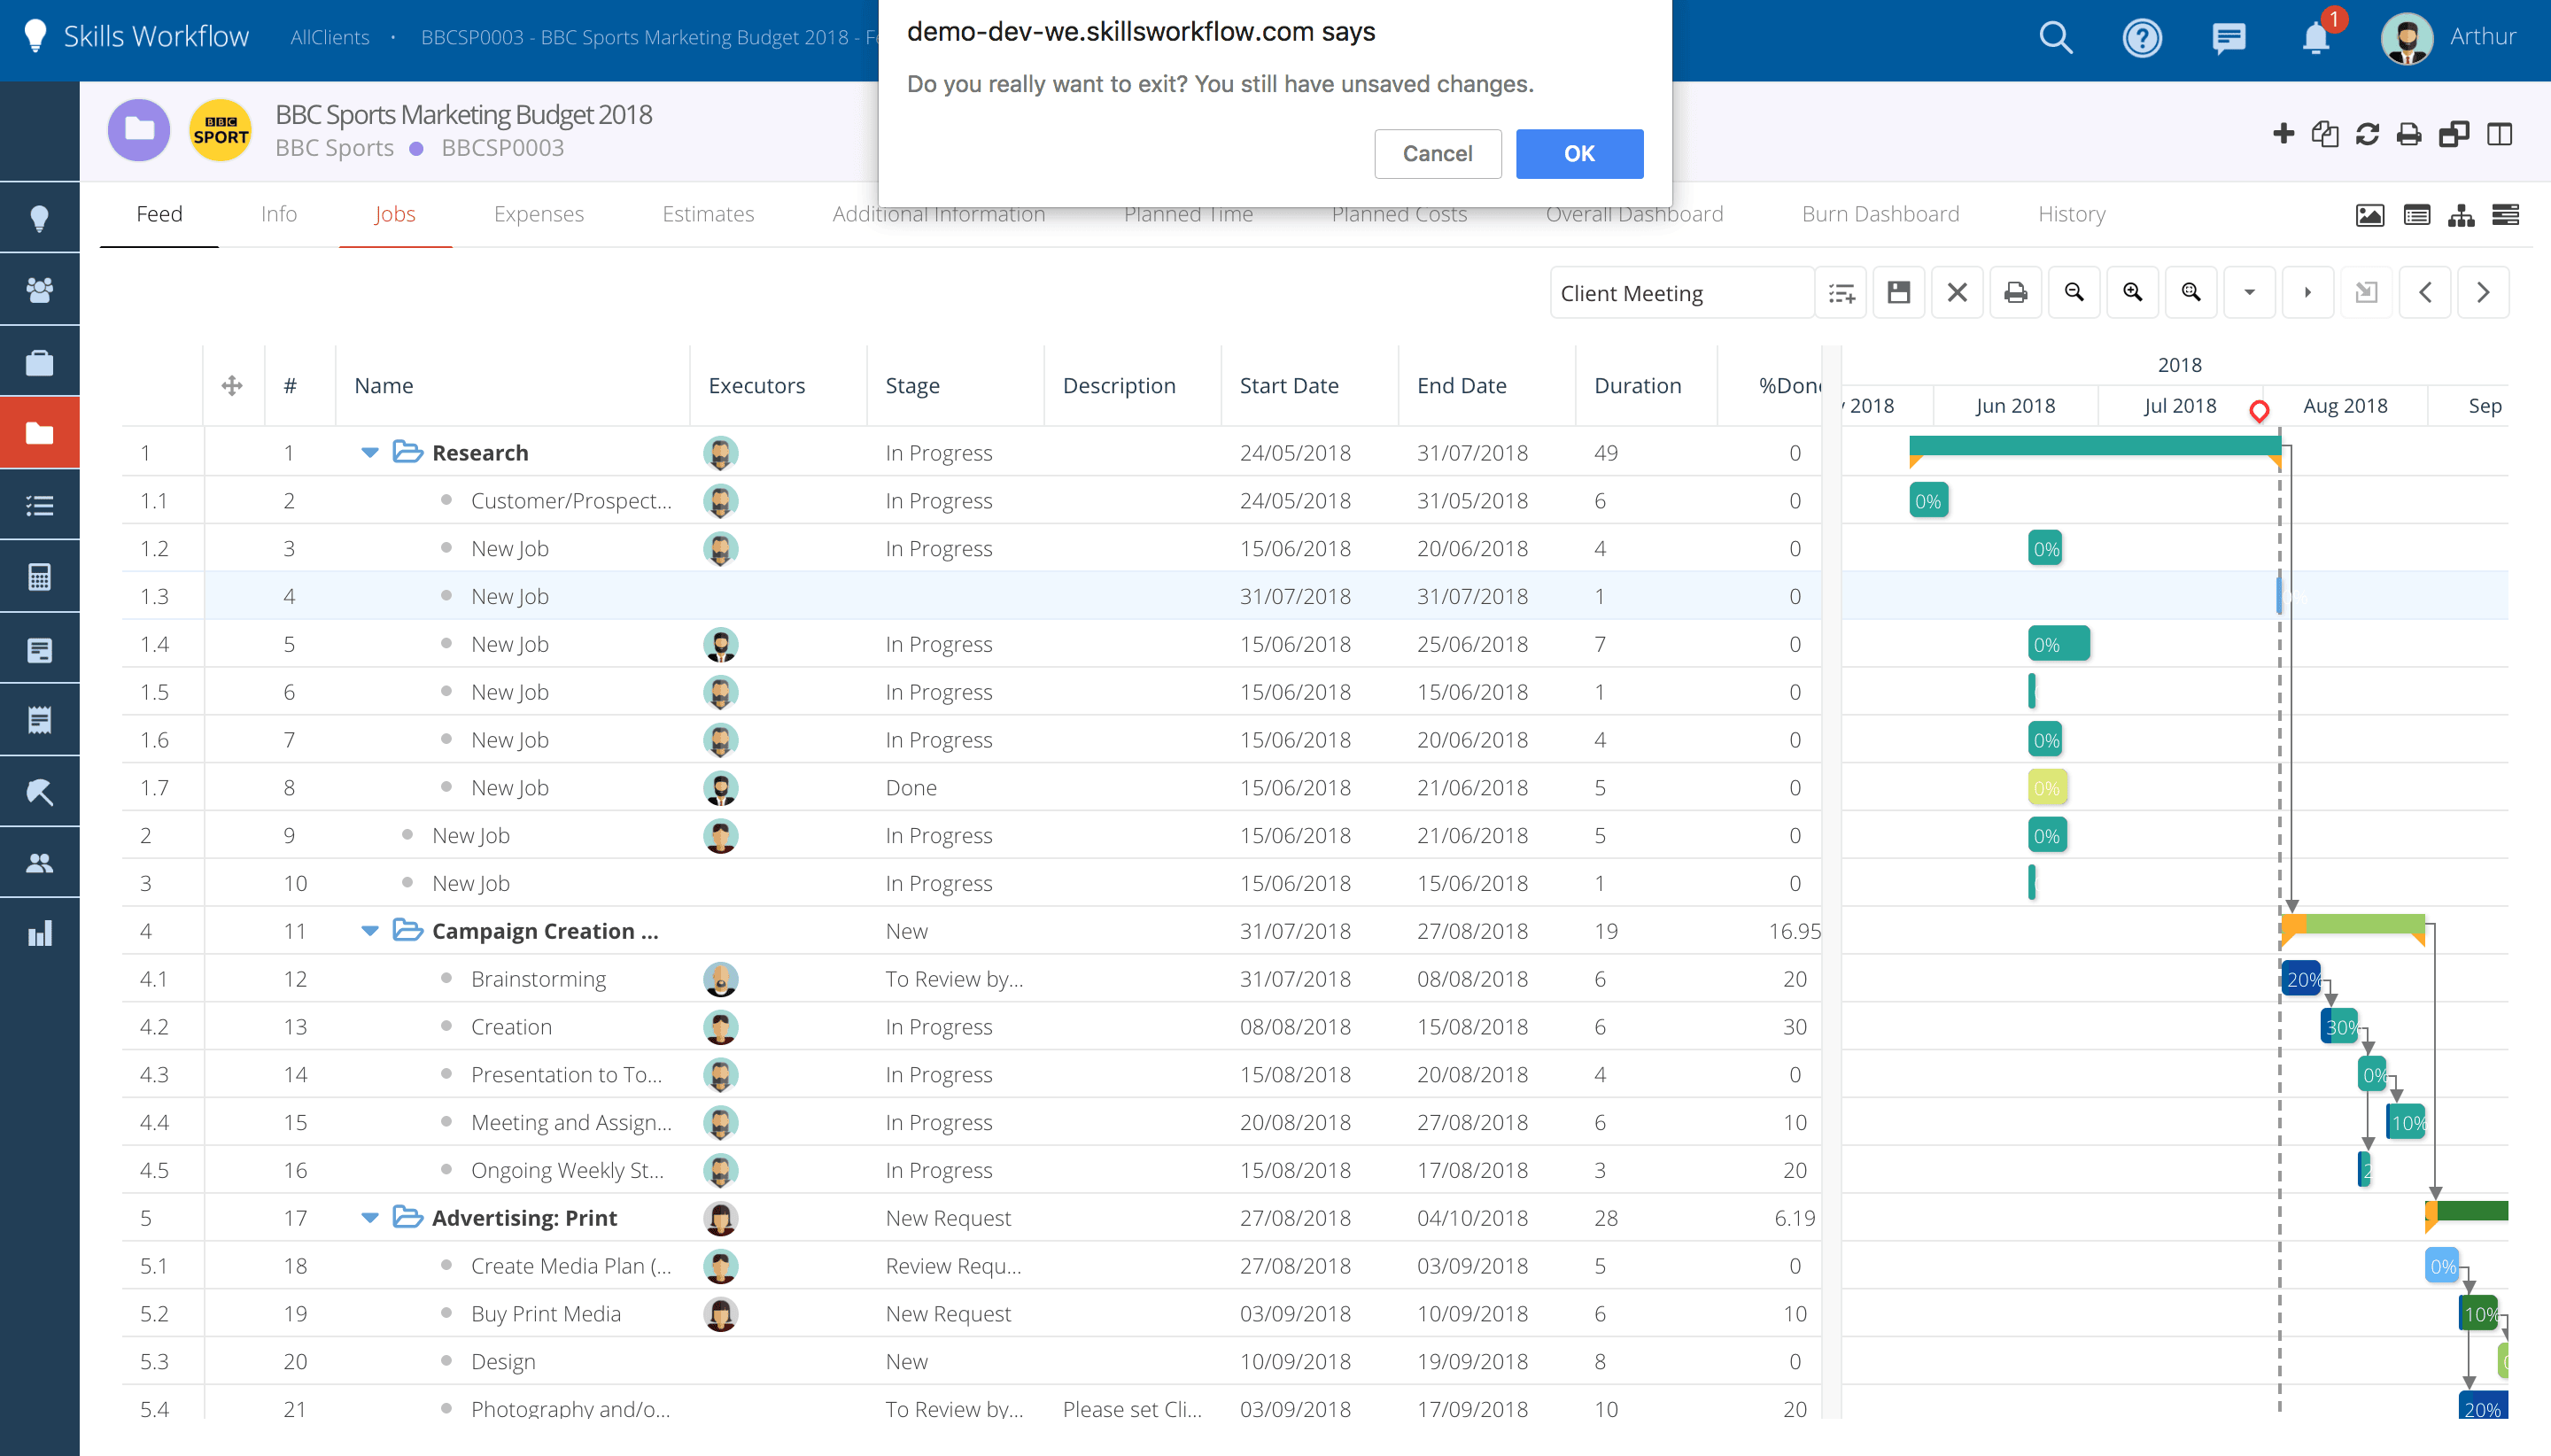
Pop-up message when leaving the project.
Whenever you try to navigate to another module/tab without saving the changes you made, a pop-up message will appear alerting that there are unsaved changes.
Availability
The Gantt comes from a workspace, and its toolbar is off unless the workspace turns it on.
Duplicate needs permission to create jobs. Bulk action needs permission to edit jobs, and the job must already be set up for bulk editing, as it is for list views. A button whose requirement is not met is hidden.
Selecting rows
The first column of the grid holds the selection checkboxes. They appear when you hover a row, and stay while the row is selected.
Tick the checkbox in the column header to select every row. Ticking a parent selects everything under it.
Clicking a row's WBS cell selects the whole row. Ctrl (Cmd on macOS) adds or removes one row. Shift extends from the last row you clicked. Clicking any other cell selects the cell, not the row.
Duplicating jobs
Select the rows and click Duplicate. The copies appear next to the originals in Draft, and become jobs when you click Save.
A duplicated parent brings its branch with it, so selecting a parent together with its children still produces one copy of the branch.
Duplicate leaves the Copy row clipboard untouched.
Editing several jobs at once
Bulk action opens the bulk editing dialog on the selected rows. It is the same dialog used in list views.
Save the Gantt first. The dialog writes to the jobs directly, and the Gantt reloads when it closes.
Rules and behaviour
With unsaved changes in the Gantt, a bulk action stops and Skills Workflow asks you to save.
Rows you have not saved yet have no job behind them. A bulk action skips them and tells you how it went.
One bulk action covers at most 100 jobs. Selecting more shows a message.
Duplicated rows are lost if you leave the Gantt without saving. Skills Workflow warns you before you navigate away.
Save stays disabled until there is something to save.
Configuration
On the Gantt component in the workspace:
showToolbarshows the toolbar, including Duplicate and Bulk action.bulkCapLimitsets how many jobs one bulk action may cover. Without it the limit is 100.allowCreateandallowBulkturn either action off for this Gantt. They otherwise follow the job's own permissions.